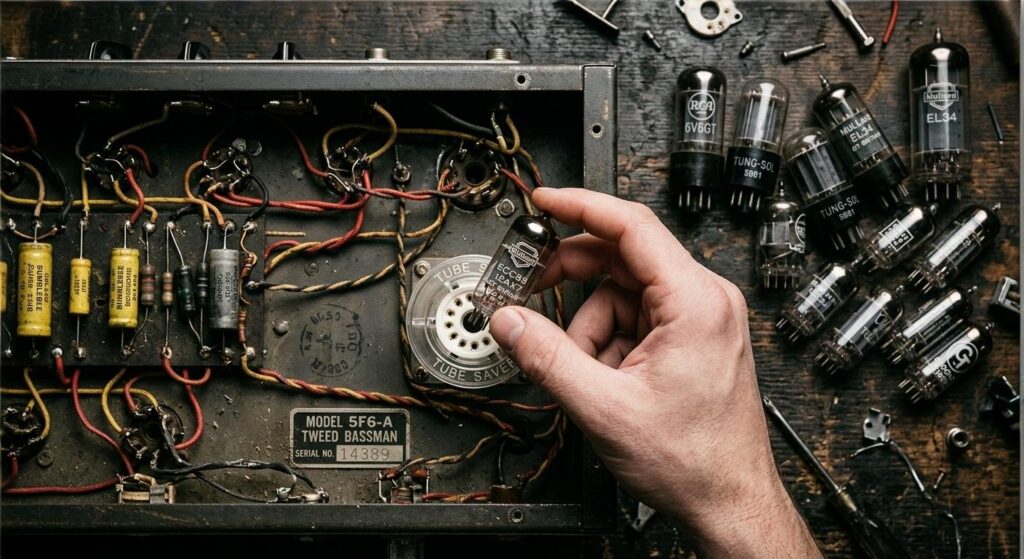
For vintage hi-fi enthusiasts and guitarists, the pursuit of perfect tone often leads to “tube rolling”—the frequent swapping of vacuum tubes to find that sonic sweet spot. However, every swap places mechanical stress on your equipment’s most vulnerable point: the original socket. Over time, this leads to socket fatigue, where metal contacts lose their tension, causing microphonics, signal dropout, and eventually, total failure.
Repairing a vintage chassis isn’t just difficult; it’s an expensive, invasive procedure that can permanently diminish the resale value of your gear. This is why the vacuum tube socket saver is an essential investment. By acting as a sacrificial interface, these components take the physical brunt of every tube change, preserving your rare, hard-to-replace hardware. In this guide, we’ll break down the mechanics of socket wear and explain how a small investment in a saver today prevents a multi-hundred-dollar repair bill tomorrow.
Related Reading: vacuum tube socket saver
What Exactly is a Vacuum Tube Socket Saver?
At its core, a vacuum tube socket saver is a “sacrificial interface”—a male-to-female adapter designed to mirror the pin configuration of your amplifier’s original chassis-mounted socket. It functions as a protective buffer: you plug the saver into the vintage socket once, and it remains stationary. From that point forward, all physical contact during tube swaps occurs at the top of the saver rather than the original hardware.
The primary engineering goal is to combat “socket fatigue.” Vintage sockets, particularly those made of aged phenolics or early ceramics, are prone to mechanical degradation. Every time a tube is inserted or extracted, the metal pin grips (the “leaf springs” inside the socket) are flexed. Over decades, this constant tension and release causes the metal to lose its memory, leading to loose connections, microphonic crackling, or total signal loss. Furthermore, the physical torque required to rock a stubborn tube out of its seat can stress the solder joints on the underside of the chassis, potentially cracking point-to-point wiring or delicate PCB traces.
For enthusiasts engaged in “tube rolling”—the practice of swapping different brands or eras of tubes to fine-tune an amplifier’s tonal signature—the socket saver is an essential insurance policy. While a high-quality socket saver may cost between $10 and $20, the alternative is a professional chassis repair. Replacing a hard-wired socket in a vintage McIntosh or Fender often requires hours of skilled labor, risky desoldering near brittle components, and significant bench fees. By using a socket saver, you ensure that the mechanical wear and tear is absorbed by an inexpensive, replaceable component, preserving the structural integrity and resale value of your irreplaceable vintage gear.
Understanding Socket Fatigue: The Hidden Danger to Vintage Amplifiers and Radios
Socket fatigue is a silent killer of vintage electronics, manifesting as a mechanical degradation of the metal leaf springs within a tube socket. Over decades, the repeated expansion and contraction caused by extreme thermal cycles—combined with the physical stress of insertion and extraction—causes these contacts to lose their “spring” tension. When a socket loses its grip, the resulting high-resistance connection can lead to signal dropouts, microphonics, or catastrophic arcing that can destroy a rare output transformer.
For the modern enthusiast, the primary catalyst for this fatigue is “tube rolling.” While swapping a vintage Mullard for a Telefunken can refine your tone, the physical act of pushing and pulling pins through a 60-year-old phenolic or ceramic base is high-risk. These original components are often brittle; a single aggressive swap can crack the wafer or permanently widen the pin grips beyond repair.
The financial implications of a failed socket are significant. In a point-to-point wired vintage amplifier or radio, replacing a socket is not a simple “plug-and-play” task. It requires hours of precision bench work to desolder complex lead dress, often risking damage to surrounding “mustard” capacitors or carbon-composition resistors that are vital to the unit’s mojo. A professional technician’s labor for a single socket replacement can easily range from $150 to $300. By contrast, a socket saver serves as a sacrificial interface. It absorbs 100% of the mechanical friction and tension, ensuring that your chassis-mounted original remains undisturbed. By moving the wear-and-tear to a $20 replaceable part, you effectively immunize your vintage investment against the inevitable physics of mechanical failure.
The Sacrificial Interface: How Socket Savers Prevent Mechanical Wear and Tear
Think of a vacuum tube socket saver as the “sacrificial lamb” in your signal chain. In the world of vintage restoration, the most vulnerable point of failure is the mechanical interface where the tube pins meet the chassis-mounted socket. Every insertion and extraction cycles the tension of the internal leaf springs. In a 60-year-old Fender or McIntosh, these springs are often brittle or have lost their “memory,” making them prone to snapping or losing electrical continuity under the physical stress of a tight-fitting tube.
By installing a socket saver, you shift the mechanical burden away from the irreplaceable original hardware. The saver acts as a buffer; once plugged in, its high-tension grips handle the abrasive friction and physical displacement of the tube pins. This is particularly critical for “tube rolling” enthusiasts. If you are frequently swapping different 12AX7s or EL34s to find a specific tonal signature, you are subjecting the socket to repeated mechanical fatigue. With a saver, the physical wear occurs on a $15, easily replaceable component rather than a riveted, point-to-point wired socket that requires a professional technician to replace.
The cost-benefit analysis is stark. A professional chassis repair for a damaged socket often involves hours of labor, the risk of heat damage to surrounding vintage components during desoldering, and the potential loss of the gear’s “all-original” collector value. In contrast, a socket saver absorbs the oxidation, friction, and tension loss inherent in every tube change, ensuring that the original chassis remains untouched and structurally sound for decades to come.
Why Every “Tube Roller” Needs Socket Savers in Their Toolkit
For the dedicated audiophile or guitar tone chaser, “tube rolling”—the practice of swapping different brands and vintages of tubes to fine-tune a device’s sonic signature—is a cornerstone of the hobby. However, this pursuit of the perfect harmonic richness comes with a significant physical cost to your equipment. Vintage chassis, particularly those from the mid-century era, were designed for occasional maintenance, not the repetitive mechanical stress of frequent swapping.
Every time you rock a tube out of its socket to pull it, you are subtly expanding the metal contact “fingers” and stressing the brittle solder joints beneath the chassis. For “rollers,” this cumulative damage accelerates socket fatigue exponentially. A socket saver acts as a vital insurance policy, allowing you to experiment with dozens of different 12AX7s or EL34s while the original, fragile component remains undisturbed.
The cost-benefit analysis is undeniable. A high-quality socket saver typically costs between $10 and $25. In contrast, replacing a damaged chassis-mounted socket in a vintage McIntosh or Fender amplifier is a surgical procedure. It requires deep-chassis desoldering, potential removal of surrounding components, and the difficult sourcing of period-correct parts. With professional bench fees often starting at $100 per hour, a single lost contact or a cracked mounting flange can result in a repair bill exceeding $300 and a decrease in the instrument’s resale value. By treating the socket saver as a replaceable, sacrificial interface, you preserve the structural integrity of your gear, ensuring your quest for the perfect tone doesn’t result in a catastrophic hardware failure.
Comparing Costs: The Price of a Socket Saver vs. Professional Chassis Repair
When evaluating the financial logic of using socket savers, the math favors the enthusiast every time. A high-quality socket saver—such as a Belton or a premium ceramic gold-plated unit—typically retails between $10 and $25. In the world of vintage hi-fi and guitar amplifiers, this is a negligible “insurance premium” compared to the alternative.
If a vintage chassis socket fails due to fatigue or a broken tensioning leaf, the repair process is neither simple nor cheap. Most reputable technicians charge a minimum bench fee ranging from $75 to $125 just to open the chassis. From there, the costs escalate:
* Labor Intensive Repairs: Replacing a socket in a point-to-point wired amplifier or a crowded radio chassis is a surgical procedure. It requires desoldering multiple vintage components, often involving brittle lead dress and fragile terminal strips. Two to three hours of skilled labor can easily result in a $200–$300 repair bill.
* Parts Sourcing: Finding a period-correct, New Old Stock (NOS) socket to maintain the gear’s integrity is becoming increasingly difficult and expensive. Modern replacements often require drilling new mounting holes, which permanently devalues the vintage chassis.
* Resale Value: For collectors, “originality” is currency. A replaced socket, especially if the soldering is sloppy or the part is non-period-correct, can shave hundreds of dollars off the resale value of a Marantz, McIntosh, or vintage Plexi.
By using a socket saver, you are effectively shifting all mechanical friction and thermal stress to a $15 sacrificial component. When the saver eventually wears out after hundreds of tube swaps, you simply unplug it and insert a new one. You avoid the bench fee, the shipping risks of sending your gear to a tech, and, most importantly, you preserve the pristine, original state of your vintage investment.
Compatibility Guide: Finding Savers for 7-Pin Miniature, 9-Pin Noval, and Octal Sockets
To effectively protect your investment, you must match the saver to the specific physical architecture of your vintage chassis. While the concept of a sacrificial interface remains constant, the mechanical requirements vary significantly across the three most common tube standards found in hi-fi and guitar amplification.
7-Pin Miniature Sockets
Commonly used for small-signal pentodes and rectifiers (like the 6AU6 or 6X4) in vintage radios and preamps, 7-pin miniature sockets are notoriously fragile. Because the pin-circle is only 0.375 inches in diameter, the internal spring clips are tiny and prone to “pin-spread.” A 7-pin saver is essential here because these sockets were often mounted on thin, flexible chassis that can warp under the pressure of repeated tube extraction.
9-Pin Noval Sockets
The 9-pin Noval is the industry standard for the 12AX7 and EL84 families. Because these tubes are the primary targets for “tube rolling,” their sockets endure the highest frequency of mechanical cycles. When selecting a 9-pin saver, ensure it features high-quality ceramic construction. Ceramic handles the heat dissipation of EL84 power tubes better than plastic or Bakelite, preventing the saver itself from becoming a point of failure.
Octal (8-Pin) Sockets
Found in iconic power stages (6L6, EL34, KT88) and rectifiers (5AR4), Octal sockets feature a central “keyway” for orientation. Octal savers must have a precision-molded center guide to ensure the indexing key aligns perfectly. Since these tubes often operate at high voltages and generate significant heat, look for savers with gold-plated copper alloy pins to maintain low contact resistance and prevent “arcing,” which can lead to the very chassis damage you are trying to avoid. Always verify that the saver’s height does not interfere with the amplifier’s cabinet or headshell clearance.
Do Socket Savers Affect Audio Quality? Addressing Signal Integrity and Heat Concerns
For many audiophiles and vintage gear enthusiasts, the primary hesitation regarding socket savers isn’t mechanical—it’s electrical. The core concern is whether adding an additional interface between the tube pins and the original socket introduces signal degradation, increased contact resistance, or detrimental heat retention.
From a technical standpoint, a high-quality socket saver constructed with gold-plated phosphor bronze or beryllium copper pins introduces negligible contact resistance—often measured in the milliohms. In the context of a high-voltage vacuum tube circuit, where input impedances are high and signal voltages are substantial, this additional junction is electrically transparent. While purists might argue that “less is more” in a signal path, the sonic impact is virtually imperceptible compared to the degradation caused by the loose, oxidized, or fatigued contacts of an original 60-year-old socket.
Regarding heat, socket savers can actually offer a secondary benefit: thermal decoupling. By elevating the tube 0.5 to 1 inch above the chassis, you increase the surface area available for convective cooling. This can reduce the amount of radiant heat transferred directly to the electrolytic capacitors and sensitive components located just beneath the tube sockets. However, in height-restricted enclosures, you must ensure that the elevated tube still has adequate clearance for airflow to prevent “hot spots” at the top of the cabinet.
Finally, while adding a socket saver does technically introduce a minute amount of parasitic capacitance, this is only a concern in ultra-high-frequency RF applications. For audio-frequency reproduction (20Hz–20kHz), the change is mathematically insignificant. Ultimately, the trade-off is clear: the microscopic risk to signal integrity is far outweighed by the protection of your vintage transformer and chassis from the physical trauma of “tube rolling” and mechanical failure.
Installation Best Practices: How to Safely Seat Your Tubes and Savers
Proper installation is a “one-and-done” procedure designed to minimize mechanical stress on your vintage amplifier’s delicate internal wiring. Before introducing the socket saver, inspect the original chassis socket for oxidation or loose tension. If necessary, a light application of a high-quality contact cleaner like DeoxIT D5 will ensure optimal conductivity before the saver becomes a semi-permanent fixture.
When seating the saver, alignment is critical. For 9-pin Noval or 7-pin Miniature sockets, identify the specific pin gap; for Octal sockets, align the center keyway perfectly. Apply firm, purely vertical pressure. Avoid the common mistake of “rocking” the component into place, as this lateral force is precisely what causes the pin-grip fatigue you are trying to avoid. Once the saver is fully seated against the chassis or the original socket face, it should feel immovable and flush.
Now that the “sacrificial interface” is established, you can begin tube rolling. When inserting your vacuum tubes into the saver, ensure the pins are perfectly straight. Because you are now interacting with a modern, high-tension socket rather than the fragile vintage original, you can seat the tube with confidence. However, always support the socket saver with one hand if the chassis architecture allows, ensuring that the downward force of “rolling” doesn’t stress the underlying PCB or point-to-point solder joints. Periodically check that the saver remains flush; a loose connection can lead to micro-arcing or intermittent signal loss, undermining the protective benefits of the device. By treating the saver as a permanent extension of the chassis, you isolate the wear to a replaceable part while maintaining the integrity of the vintage hardware.
Identifying Quality: What to Look for in High-Temperature Electrical Components
When selecting socket savers for vintage gear, you are not just buying a spacer; you are investing in a critical thermal and electrical barrier. High-quality components are distinguished by their material composition and mechanical tolerances, which must withstand the grueling environment of a vacuum tube’s thermal envelope.
First, prioritize housing materials. In high-wattage applications—such as power stages utilizing EL34s or KT88s—standard plastic housings are inadequate. Look for steatite ceramic or high-grade Micanol. These materials offer superior dielectric strength and remain structurally stable at temperatures exceeding 200°C, preventing the melting, warping, or “outgassing” common in cheap nylon alternatives which can leave a film on your tube pins.
Second, examine the contact metallurgy. The primary failure point in budget savers is the loss of spring tension in the internal clips due to repeated thermal cycling. Premium savers utilize beryllium copper or phosphor bronze contacts, often plated in thick gold or silver. These alloys maintain their “memory” and tensile strength far better than tin-plated brass, ensuring a low-resistance connection that won’t loosen or oxidize over time.
Lastly, inspect the pin construction. Expert-grade savers feature precision-machined, solid pins rather than rolled or stamped metal. Machined pins provide a more consistent diameter, ensuring they don’t inadvertently widen the original chassis socket lugs—the very damage you are trying to prevent. Furthermore, verify the insulation resistance and voltage rating; for high-voltage amplifiers, the saver must provide enough clearance to prevent “arcing” between pins. A quality saver acts as a robust extension of your circuit, maintaining signal integrity while absorbing the mechanical brunt of tube rolling.
When to Replace Your Socket Saver to Maintain Peak Performance
While a socket saver is designed to endure the brunt of mechanical stress, it is not a permanent fixture. Its role as a “sacrificial interface” means it will eventually succumb to the same metallurgical fatigue it protects your vintage chassis from. To maintain peak performance, you must treat the saver as a high-quality consumable rather than a “set and forget” component.
The primary indicator for replacement is a loss of mechanical tension. If you notice that tubes seat with significantly less resistance than when the saver was new, the internal contact springs have likely reached their elastic limit. Loose tolerances lead to micro-arcing—tiny electrical jumps between the pin and the socket—which causes carbon buildup and pitting. If you see visible oxidation or darkening on the saver’s pin receptacles, or if you experience “crackle” when the tube is gently nudged, the saver’s conductivity is compromised.
For “tube rollers” who swap components weekly, a proactive replacement schedule of every 12 to 18 months is recommended. For stationary setups, the saver should be inspected during every tube change. Use a magnifying glass to check for hairline fractures in the ceramic or micanite body, which can occur due to years of thermal cycling. Remember, the saver’s job is to fail so your chassis-mounted socket doesn’t. Replacing a $20 saver at the first sign of wear is a negligible cost compared to the risk of an intermittent connection damaging a rare NOS (New Old Stock) tube or necessitating a complex, value-devaluing chassis repair. When in doubt, swap it out; maintaining a tight, low-resistance interface is the only way to ensure your vintage gear sounds as the original engineers intended.
Have questions or your own tips to share? Drop a comment below!