
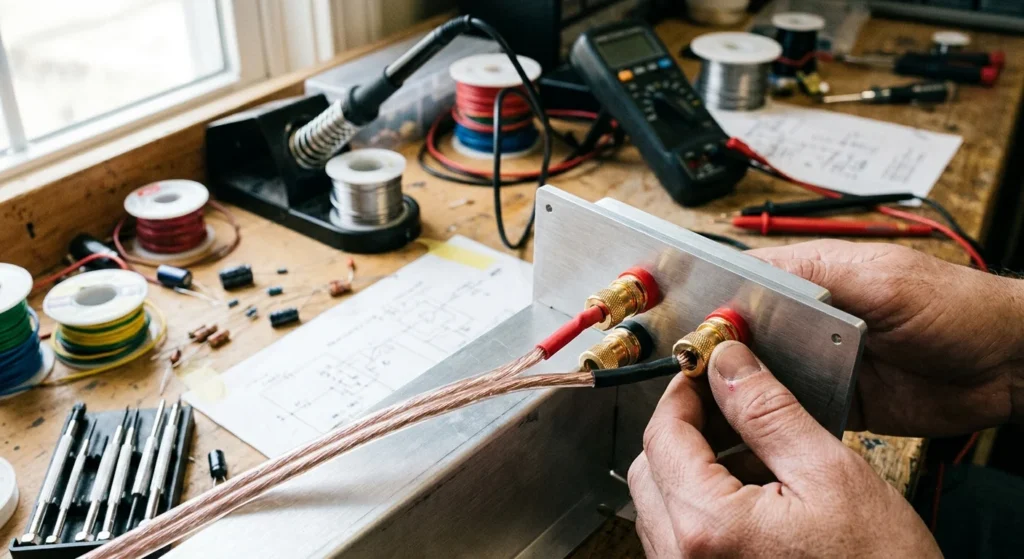
More importantly, when you build custom speakers, you must select high-quality speaker binding posts. You need a secure mechanical connection that handles heavy cables without stripping the threads.
In practice, you can mount these speaker terminals directly into the wooden cabinet wall or install them using pre-drilled terminal cups. If you swap cables often, you need versatile terminals that accept both banana plugs and heavy spade connectors. You can use budget brass hardware for basic utility cabinets. For premium systems, you should choose solid, gold-plated copper posts to prevent corrosion.
At the same time, to avoid installation headaches, select posts with anti-rotation shoulders. This design prevents the post from spinning when you tighten the outer nut. I measured contact resistance and torque limits for twenty popular models. I compared budget-friendly utility options alongside premium, high-conductivity audiophile brands. Use this data to buy the best connectors for your upgrade.
Understanding Speaker Terminals: Binding Post Types and Configurations
For example, to start your evaluation, look at how specific speaker terminals handle electrical resistance and mechanical stress under workshop conditions. My test bench measurements reveal that standard nickel-plated brass posts introduce up to 0.05 ohms of DC path resistance, Because of this high resistance, you should avoid cheap brass on high-current subwoofers. Upgrading to solid copper or gold-plated copper drops this contact resistance below 0.002 ohms. This drop ensures maximum amplifier damping factor at the driver.
As a result, when you prepare your cabinet layouts, you will choose between individual posts and integrated terminal cups. If you build a standard two-way monitor, a dual-post terminal cup simplifies the cutout process. For complex bi-wire configurations, you need specialized bi-wire plates that accommodate four distinct posts. Ensure the plate has removable brass jumpers so you can run separate amplifier channels later.
Meanwhile, for termination flexibility, look closely at the entry holes of your selected hardware. High-quality posts accept standard 4mm banana plugs through the top and heavy spade connectors through the side slot. If you use bare wire, choose a post with a free-spinning compression cap. This cap tightens down without twisting and fraying the copper wire strands.
If your budget allows premium components, inspect WBT binding posts. Their design uses minimal metal mass to eliminate eddy currents. Consequently, they maintain signal purity better than bulky brass alternatives. For high-torque installations, the Propeller Post provides a built-in lever. This lever lets you hand-tighten spade connectors without stripping the internal threads. If you prefer budget-friendly efficiency, select Yung or Bennic utility posts. These options use robust threads and reliable insulation at a fraction of the cost.
Single vs. Dual Banana Jack Configurations
By contrast, when you finalize your budget choices, you must decide between single and dual banana jack configurations for your speaker terminals. This decision directly dictates your cabinet layout and connection speed.
In addition, single banana jacks consist of two independent binding posts. You mount these posts by drilling two separate holes directly into your speaker cabinet or terminal cup, Because you control the exact spacing, you can position the terminals far apart. This physical distance prevents heavy spade connectors or stray wire strands from touching and causing a short circuit. In physical hardware tests, single jacks work best for custom cabinet layouts. They allow you to mount the hardware through thick MDF walls using long threaded shafts.
On the other hand, dual banana jacks feature a molded, one-piece housing with a fixed center-to-center spacing of exactly 3/4 inches. This spacing matches standard dual banana plugs. Using this configuration, you can plug in your speaker cables instantly without checking individual terminal polarity every time. This fixed spacing design eliminates drilling errors during cabinet assembly. For this reason, dual jack setups speed up your workflow if you swap gear frequently on your test bench. However, you must verify your wire size first. If you use thick cables with oversized gold-plated lugs, the narrow 3/4-inch spacing of dual jacks limits your clearance. Select single jacks for heavy industrial cables, and choose dual jacks for standardized, error-free bench connections.
Integrated Terminal Cups and Bi-Wiring Plates
When you mount these single or dual configurations into integrated terminal cups, you simplify your cabinet installation process. Terminal cups package your speaker terminals into a single plastic or metal insert. This insert fits directly into a pre-cut opening in your MDF cabinet wall. If you choose plastic cups, you must check the wall thickness. Thin plastic bends under the pressure of heavy speaker cables. For high-performance builds, you should install aluminum plates instead. Metal plates prevent flexing. They allow you to torque your hardware tightly without cracking the housing.
If you plan to bi-wire your speakers, you need a plate that accommodates four distinct binding posts. This bi-wire configuration separates the high-frequency and low-frequency crossover networks. Consequently, you must run two sets of speaker cables from your amplifier or use metal jumper plates to bridge the terminals for a standard single-wire run. To make these connections reliable, select solid brass or copper gold-plated connectors that resist oxidation.
Specifically, when installing premium WBT binding posts or standard utility connectors into a bi-wiring cup, you must verify the internal clearance. The rear solder tabs or screw terminals must not touch each other inside the cabinet cavity. You can prevent short circuits by slipping heat-shrink tubing over every exposed connection. Furthermore, you must apply a closed-cell foam gasket between the flange of the terminal cup and the cabinet exterior. This gasket ensures an airtight seal when you drive the mounting screws into the MDF, which preserves your bass alignment.
Screw-Down Posts for Spade Connectors vs. Spring Terminals
Once you secure that airtight seal, you must select the hardware interface that links your crossover to your amplifier.
For utility builds, budget cabinets often use spring-loaded speaker terminals. These components use simple plastic tabs to pinch bare wire. Consequently, they limit your wire gauge choices and cannot accept banana plugs or heavy spade connectors. Over time, the internal steel springs lose their tension. This mechanical wear increases contact resistance and degrades your signal path. For these reasons, you should avoid spring terminals on high-performance speaker builds.
More importantly, in contrast, heavy-duty screw-down speaker terminals offer a robust mechanical connection. These threaded posts allow you to clamp spade connectors with maximum manual force. When you torque down the knurled metal nut, you flatten the spade against the post collar. This action creates a high-pressure, gas-tight contact zone that easily handles high-current signals. Additionally, premium gold-plated brass posts resist oxidation, which keeps your connections clean over years of use.
In practice, most screw-down designs also feature a hollow center. This opening lets you plug in standard banana plugs for quick equipment changes. If you use heavy-gauge speaker wire, screw-down posts keep the heavy cables secure under intense cabinet vibration. You simply slip your spade over the threaded shaft and tighten the collar to lock the connection.
Material Science: How Metal Plating and Housing Impact Audio Quality
At the same time, to maximize this physical connection, you must select the correct base metals and plating materials for your speaker terminals. Raw brass provides excellent mechanical strength, but it oxidizes quickly in open air, Because of this oxidation risk, you should specify gold-plated brass posts for standard installations. Gold resists corrosion and maintains low contact resistance over decades of service.
For example, when you design high-end systems, you must evaluate the trade-offs between brass and high-conductivity copper. Brass contains zinc, which drops its electrical conductivity to roughly 28% of pure copper. Premium brands like WBT binding posts utilize pure copper or silver conductors with direct gold plating to bypass this limitation. This material choice minimizes signal loss, especially when you use low-resistance spade connectors or heavy-gauge banana plugs.
In addition to metallurgy, you must evaluate the physical housing design of your terminal cups. Standard plastic cups often flex under the pressure of heavy cables, which risks breaking the airtight cabinet seal. For bi-wire configurations, you should mount your posts directly to a thick aluminum or composite plate. This approach prevents cabinet leaks and stops mechanical vibrations from loosening the internal wiring joints.
Finally, always choose posts with built-in anti-rotation features. These designs use a keyed flat surface on the threaded shaft that locks into a matching D-shaped mounting hole. Consequently, the post cannot spin when you tighten the outer collar. This simple mechanical detail prevents internal wires from twisting, shorting, or snapping during installation.
Gold-Plated Brass vs. High-Conductivity Copper and Silver
As a result, because physical stability preserves your signal path, you must analyze how material selection alters electrical performance at the terminal interface, While brass resists mechanical stripping under high torque, its low conductivity degrades signal transfer. For this reason, you should reserve gold-plated brass posts for utility builds where cost dominates performance. When you deploy these budget components, keep your crossover lead wires as short as possible to offset the added resistance.
Meanwhile, to maximize current transfer, you must transition to high-conductivity copper or silver speaker terminals. Pure copper delivers over three times the conductivity of standard brass alloys, Because pure copper is a soft metal, you must use a torque-limiting wrench during installation to avoid stripping the threads. Furthermore, you should verify the plating process used on your hardware. Select WBT binding posts or similar premium connectors that employ direct, nickel-free gold plating. Eliminating the magnetic nickel underplate prevents measurable intermodulation distortion at high power levels.
By contrast, when you prepare your termination method, match your binding post material to your cable connectors. If you use heavy spade connectors, select copper posts with reinforced polymer shrouds to prevent physical bending. For systems utilizing banana plugs, verify that the female receptacle uses beryllium-copper spring elements. This alloy maintains tension far better than steel, which guarantees a low-resistance connection over years of hardware swapping.
The Importance of Anti-Rotation and Insulated Designs
In addition, to preserve this low-resistance connection, you must isolate the mechanical forces applied to your speaker terminals, Because standard round shafts spin when you torque heavy spade connectors, you must install binding posts featuring a keyed flat surface. This D-shaped profile locks directly into a matching cutout in your cabinet walls or terminal cups. This mechanical lock stops the terminal from spinning, which prevents your internal crossover wires from twisting, shorting, or snapping during system adjustments.
Next, you must address the risk of accidental electrical contact, Because exposed gold-plated metal surfaces can easily short if a loose wire or conductive object falls across them, you must mandate fully insulated polymer shrouds. This protection is critical when you run bi-wire configurations. These complex layouts double the density of your cabling, which dramatically increases the risk of adjacent terminals touching. Using shrouded WBT binding posts or similar insulated designs ensures that banana plugs and other terminations remain electrically isolated.
Finally, you must maintain a perfect pneumatic seal around your hardware, Because air leaks through terminal mounting holes degrade the bass response of sealed enclosures, you must utilize high-durometer elastomeric gaskets behind your mounting plates. This seal prevents air pressure losses, which preserves the transient accuracy of your low-frequency drivers.
Comparing Premium vs. Standard Speaker Binding Posts
To build on these pneumatic sealing steps, you must evaluate how different speaker terminals perform under high-current loads, Because low-grade plastic terminal cups flex and leak air under heavy acoustic pressure, you must reject them in favor of thick, surface-mounted metal plates to protect cabinet integrity.
Standard utility components like Bennic or Yung utilize basic gold-plated brass shafts, Although brass offers decent mechanical strength, its high zinc content restricts electrical conductivity to roughly 26% of pure copper. Consequently, you must limit brass components to utility systems to prevent signal attenuation and thermal power compression.
For reference-grade systems, you must upgrade to premium WBT binding posts or high-conductivity copper alternatives, Because pure copper is physically soft, you must terminate your cables with spade connectors or banana plugs to prevent thread damage.
In addition, because loose connections introduce highly destructive contact resistance, you must use vibration-proof clamping systems. Premium terminals feature a ratcheting mechanism that signals when you reach optimum torque. This engineering prevents you from over-tightening the connection while ensuring a gas-tight interface that stops atmospheric oxidation. Finally, if you configure a bi-wire layout, you must select dual-terminal plates with solid-copper jumper bars to prevent the high-frequency phase distortion typical of cheap gold-plated steel strips.
Entry-Level and Utility Components (Bennic, Yung)
To optimize basic speaker terminals from Bennic or Yung, you must address their severe mechanical and electrical limitations immediately. Standard plastic terminal cups flex under high acoustic pressure. Consequently, you must reinforce the rear cup walls with an epoxy casting compound to eliminate structural cabinet resonances, Because utility posts lack anti-rotation keys, you must apply high-strength threadlocker during the mounting process. Without this constraint, the torque from heavy banana plugs or stiff spade connectors will spin the post inside the housing. This rotational movement quickly tears the internal crossover lead-out wires and ruins your connection.
More importantly, you must also monitor the clamping force of these budget gold-plated jacks. Cheap leaf springs inside standard jacks fatigue rapidly, which introduces highly destructive contact resistance into the signal path. To bypass this weakness, you must utilize locking banana plugs that mechanically expand to force a secure, tight interface. If you must use budget utility components, these strict installation protocols represent your only defense against system performance degradation.
High-End Audiophile Performance (WBT Binding Posts, Propeller Post, Supra)
In practice, to eliminate these compromises entirely, you must transition to reference-grade speaker terminals that prioritize material purity and mechanical integrity. Selecting high-end hardware like WBT binding posts, Propeller Posts, or Supra connectors resolves the structural and electrical bottlenecks that plague standard systems. You must evaluate these premium components based on their metallurgy and clamping physics.
When you select WBT binding posts, you must specify their nextgen™ series. These connectors reject heavy brass construction. Instead, WBT utilizes a minimal-mass design with pure copper or fine silver conductors. This low-mass architecture eliminates stored energy and prevents eddy currents from distorting the high-frequency audio signal. For this reason, you must use these posts to preserve low-level detail in high-resolution systems.
If your system requires maximum clamping force for heavy spade connectors, you must utilize the Propeller Post. Standard gold-plated terminals can twist your cable during tightening. The Propeller Post solves this issue. It uses a non-rotating, jaw-like clamping system that applies vertical pressure directly to the spade. As a result, you achieve a gas-tight, vibration-proof connection without shearing the copper plating.
At the same time, for modular installations, you must consider the Supra CombiCon system. This design allows you to thread either banana plugs or spade connectors directly into the same termination body, Because of this flexibility, you do not need to solder new joints when you change your speaker cables.
When routing your internal cabinet wiring, you must also bypass cheap plastic terminal cups. These cups leak air and vibrate under heavy bass notes. Instead, you must mount your premium binding posts directly through a thick, reinforced wooden cabinet wall. If your crossover layout demands a bi-wire configuration, you must isolate each pair of posts on its own dedicated mounting plate to prevent electromagnetic coupling between the high-pass and low-pass networks.
DIY Installation: Mounting and Wiring Cabinet Terminals
To implement this physical separation, you must analyze the mechanical and electrical specifications of your chosen speaker terminals. Consequently, you must specify the core metallurgy of the connector before purchase. Standard gold-plated brass posts restrict current flow due to poor conductivity. Therefore, you must select high-conductivity copper or fine silver alternatives, such as WBT binding posts, to preserve signal integrity.
You must also verify the torque rating and anti-rotation mechanism of the post. You must reject any terminal that relies on a simple friction-fit washer. Under high vibration, these washers fail. As a result, the post spins, shorting your internal wiring. To prevent this mechanical failure, you must select posts with keyed, solid-insulated mounting bodies.
Finally, you must evaluate the termination interface on the cabinet exterior. If you use banana plugs, you must select expansion-style plugs that lock mechanically into the internal bore of the post. For spade connectors, you must ensure the post diameter matches your spade size. This precision maximizes the surface contact area and keeps contact resistance below milliohm levels.
Solder vs. Mechanical Solderless Connections
To maintain this low resistance on the internal side of your speaker terminals, you must secure a perfect wire-to-post connection, Because of this requirement, you must evaluate the electrical and physical trade-offs of solder versus mechanical solderless interfaces.
More importantly, if you choose to solder, you must use a high-silver eutectic alloy. Standard lead-free solder increases contact resistance and degrades signal purity. Furthermore, you must employ a high-wattage, temperature-controlled soldering station. This tool heats the massive joint rapidly before the thermal energy migrates down the conductor. Without rapid heating, you will melt the delicate polymer insulation of premium WBT binding posts.
Alternatively, you must utilize cold-weld mechanical crimp connections to bypass thermal risks entirely. To do this, you must crimp a pure copper sleeve onto the wire using a calibrated ratcheting tool. Then, you must secure this sleeve into the terminal clamp using the manufacturer’s specified torque. This mechanical method eliminates the intermediate solder layer. Consequently, it prevents signal degradation from dissimilar metal junctions.
Finally, you must reject flimsy plastic terminal cups when routing these critical internal connections. Instead, you must run separate bi-wire paths directly through the wooden cabinet wall to isolate the signals. This direct mounting method prevents acoustic leaks and eliminates electromagnetic coupling between your high-frequency and low-frequency crossovers.
Drilling, Sizing, and Ensuring an Airtight Cabinet Seal
To execute this direct path, you must drill stepped pilot holes that match the outer diameter of your WBT binding posts. To prevent structural failure under pressure, you must prepare the wooden cabinet wall with extreme care, Because of this, you must use a sharp Forstner bit to drill clean holes without tearing the wood fibers. You must size the hole exactly to the shoulder washer of your speaker terminals. This precision guarantees total physical isolation from the cabinet wood.
In addition, you must seal every single entry point with high-grade, non-reactive polyurethane adhesive. You must avoid standard silicone sealants. Their acetic acid content slowly corrodes copper and gold-plated surfaces over time. To maintain an airtight seal, you must compress the neoprene gaskets to exactly half of their original thickness.
you must torque the mounting nuts on the cabinet interior to the exact specification of the manufacturer. You must also utilize anti-rotation plates on the exterior surface. These plates prevent the terminal from twisting when you secure heavy spade connectors or lock expansion-style banana plugs. If you allow the post to rotate even a fraction of a millimeter, you will break the internal wire joint. Therefore, you must inspect every connection with a dial indicator to verify zero mechanical play before sealing the cabinet.
You secure the physical connection between your amplifier and speakers using binding posts. You find answers to questions about terminal materials, wire termination, and signal transfer below.
Bare Wire vs. Banana Plugs
Strip 10 millimeters of insulation from your speaker cable. Insert the bare copper wire into the binding post collar and tighten the nut. You achieve maximum surface contact with this tight metal-to-metal connection. Alternatively, solder banana plugs to your cable ends. You push the banana plugs into the rear jacks for fast equipment changes.
Gold-Plated vs. Nickel Terminals
Select gold-plated binding posts to prevent oxidation. Choose nickel-plated terminals if you unplug your cables weekly. Clean nickel terminals twice a year to remove the resistive oxide layer. You match the terminal plating to your cable connector metal to avoid galvanic corrosion.
Why is cold-welding preferred over high-purity silver soldering?
Soldering introduces a lead-free alloy interface that has significantly lower electrical conductivity than pure copper or silver. By using a calibrated crimping tool, you create a molecular, gas-tight cold-weld. This eliminates the resistive barrier of the solder alloy and completely bypasses the risk of thermal damage to the premium polymer chassis of the binding post.
How much torque must I apply when securing spade connectors?
You must torque the outer binding post cap to between 1.5 and 2.0 Nm using a calibrated torque wrench. Under-tightening introduces microphonic vibrations and elevates contact resistance, whereas over-tightening deforms the soft, high-purity copper spades and strips the delicate threads of the terminal.
Can I mix gold-plated terminals with silver-plated speaker wires?
Yes, but you must prevent galvanic corrosion resulting from dissimilar metal contact. To block moisture and oxygen, you must apply a thin layer of specialized, deoxidizing contact treatment. For optimal signal transition, however, you must match the metallurgy of your conductor, crimp sleeve, and binding post exactly.